Home Cinema
Page 3 of 8
Building
| Building a floor
and external wall |
|
|
As there was no external wall to the room, the
final part of the excavation was removal of the last pile of subsoil at that
end of the room.
Unfortunately, as the rubble was cleared away,
my drive fell in, and another few tons of hardcore piled into the room. This
subsoil was taken into the back garden creating another large pile which was to
stay put for over 12 months.
Here we see the workmen pouring concrete into
the room where it is being used to create the concrete floor. |
| Laying the
floor |
|
| The concrete floor was
laid extremely professionally (or so we thought). |
| July 1998, External
wall |
|
| Finally the external
wall was built. However, the job was left with a 6 foot deep, 6 foot long and 3
foot wide hole in my drive. This was filled in with concrete. |
And at this point I ran
out of money. For 12 months we lived with 20 tons of hardcore and subsoil in
the garden, no fence at the bottom of the garden and huge hole in the
downstairs hall wall leading into a cold, damp room.
Summer 1999 I was ready to
complete the job. However a lot of dampness was seen in the concrete floor -
which we thought was coming in from holes in the corner of the ceiling. I paid
for the drain located under the external wall by my garage to be replaced. This
indeed solved the problem of water coming in through the roof. I also got a
dehumidifier in the room to dry it out. However, water was still seeping up
through the concrete floor. This was disastrous. It seems the workmen who laid
the floor and external wall had not taken necessary precautions against
dampness and so the whole lot was a waste of time and money.
And so it transpired that
it would cost a further considerable amount of money to remove and replace the
external wall and floor. Winter 1999 I had the last of the subsoil in the back
garden removed and the garden fixed. Topsoil and turf had to be laid. I had new
slabs replace the broken old ones and a new garden fence erected. It was
expensive, but at least the garden was presentable again after a year looking
like a rubbish dump.
| January 2000, New
garden! |
|
| Notice the large
plywood sheets leaning against the bottom outhouse? They were used to help
shore up the drive. And the holes in the fence on the right were made by the
digger which crashed into it a couple of times. |
The local builder who
repaired my drain gave me an quote for removing the existing external wall and
floor and replacing it with properly waterproofed materials. The quote was
nearly £3,000 including a couple of substantial metal supports either
side of the door-sized hole in the supporting wall. Fed up of the delays and
wasted expenses, I made the decision to go ahead and have the job done
properly.
So May 2000 work began
again - hopefully for the last time. The existing concrete floor was broken up
and the external wall demolished. This was hard going because of the concrete
poured down the hole in the drive which had hardened against the wall.
| May 2000, Off we go
again |
|
| The drive was dug up
again and I had to place a plywood sheet over it to get in and out of the
garage each day. |
| Lets take a fresh
look |
|
The new external wall
is the business !
Grade A building bricks with water-proof cement on the
outside, a layer of water-proof cement and a second breeze-block wall on the
inside. All built onto proper foundations sunk into the ground. |
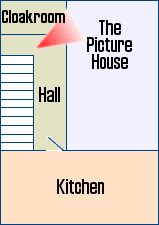
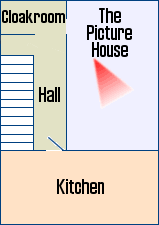
The Red triangle over the plan of the bottom floor
indicates the position and direction of the photo.
| 2nd floor |
|
 |
| This is the entrance
to The Picture House as seen from the hall at the kitchen door. Notice the pile
of cement in the corner? |
| Mixing it
up |
|
 |
| The cement was mixed
in situ. |
| 2nd floor |
|
 |
| Lets hope this one is
better than the first. |
| Surround
picture! |
|
This image is 3
pictures 'stitched' together using ace free software - Pixmaker Lite from
http://pixaround.com.
Notice the electricity pipes in
the corner. We're going to hide these - though quite how hasn't been decided,
yet. The external wall is sealed using expensive damp-proof material. Also two
steel supports are set in concrete either site of the doorway to support the
roof. The doorway itself has been straightened and the height increased to that
of a regular door. |
| Back wall |
|
| A face-on view of the
back wall. In order to get an 8 foot wide image, I anticipated that,
unfortunately, the projector will be mounted right against the rear wall. |
| Front wall |
|
| The top right-hand
corner has the bottom of the duct-air central heating column protruding down.
The electric screen will have to be be mounted in front of this. The amp and
any other electronics will be located in space on the floor behind the screen.
The centre speaker will be placed on the floor angled upwards. |
...and that's where we
were as of Thursday June 15th, 2000. If you can manage a 5 meg download,
get this pixaround program which will
allow you to do a 360 degree look at the inside of the room. Only probably
worth the download if you have a fast connection and would be impressed by the
software itself!
« Back to page 2 | On to page 4 » |


